Changing toner in a printer is a routine task that often catches home and office users off guard. Without the right guidance, this essential maintenance step can lead to frustration and mess. This comprehensive guide will walk you through a step-by-step process for any printer environment, ensuring your workspace stays clean and your print quality remains top-notch. We will delve into troubleshooting tips to resolve common challenges encountered during toner replacement. Additionally, we will explore brand-specific nuances that you should be aware of, ensuring you’re well-prepared regardless of your printer model. Together, these chapters will equip you with the knowledge you need for a hassle-free toner change experience.
Mastering Toner Replacement: A Detailed Walkthrough for Optimal Printer Performance
Replacing the toner in your printer can seem like an intimidating task, especially if you’re not familiar with handling technical components. However, with a systematic approach, you can master this essential maintenance step and ensure your printer remains in top working condition. By closely following this detailed guide, you’ll turn toner replacement into a seamless part of your printer care routine.
First, it’s crucial to set the stage for a clean and efficient process by preparing your workspace. Position your printer on a stable, flat surface that offers ample room to access the necessary panels. Make sure you have a few paper towels or gloves on hand to guard against potential toner stains during the process. Depending on your printer model, powering on the printer may be necessary, as some devices require an initial startup routine before you can proceed with toner installation.
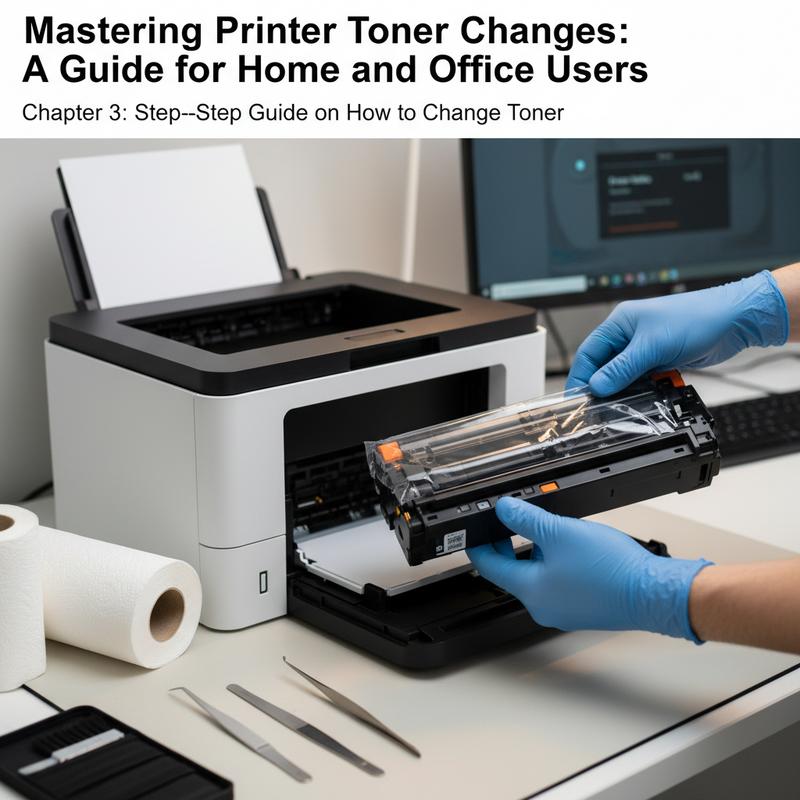
Next, you need to gain access to the printer’s internal workings by opening the printer panel. This involves locating the front or top cover, often equipped with a handle or a latch. By carefully opening this panel, you reveal the toner cartridge sitting within its designated compartment.
Once the panel is open, the time has come to remove the old toner cartridge. Grasp the handle or tabs of the cartridge firmly, and gently extract it from its slot. Certain models might incorporate a release tab or lever to secure the cartridge in place, so it’s crucial to identify and engage any such components before removal. In printers that include a drum unit, such as those made by Brother, you will first need to remove the entire drum and toner assembly, using a colored lever to detach the toner cartridge from the drum.
With the old cartridge set aside, it’s time to unpack the new toner cartridge. Carefully take it out of its protective packaging, and, if recommended by the manufacturer, gently shake the cartridge side to side. This action helps to distribute the toner powder evenly inside, which is essential for achieving consistent, high-quality prints. Don’t forget to remove any protective covers or sealing tapes that might hinder the cartridge’s functionality once installed.
Now, let’s move to the heart of the process—installing the new toner cartridge. Align the cartridge with the internal guides of the printer and slide it in firmly until it clicks into place, signifying that it is correctly seated. For printers that utilize a drum unit, ensure the new toner is locked into the drum before reinserting the entire assembly into the printer.
After securing the new cartridge, it’s crucial to close the printer panel properly. Make sure it’s closed securely to allow the printer to recognize the new installation. Often, the printer will automatically perform a short initialization sequence to adjust to the new toner cartridge.
Before concluding, execute a necessary performance check by testing the printer. Printing a test page will confirm that the toner is correctly installed and the printer’s output quality meets expectations. In the case of errors or unsatisfying print quality, verify that all seals have been removed and that the cartridge is properly aligned. Also, ensure that no residual toner powder is affecting the contact points.
Thus, by following these steps, you ensure a smooth and effective toner replacement, which is applicable to various popular printer brands such as HP, Canon, and Brother. For further guidance, you might visit the IT Carolina Printer Services page to explore professional support options if needed. Remember, feedback from your printer and consistent maintenance are your best allies in keeping it in optimal operating condition.
Navigating Toner Troubles: Solutions for Common Cartridge Woes
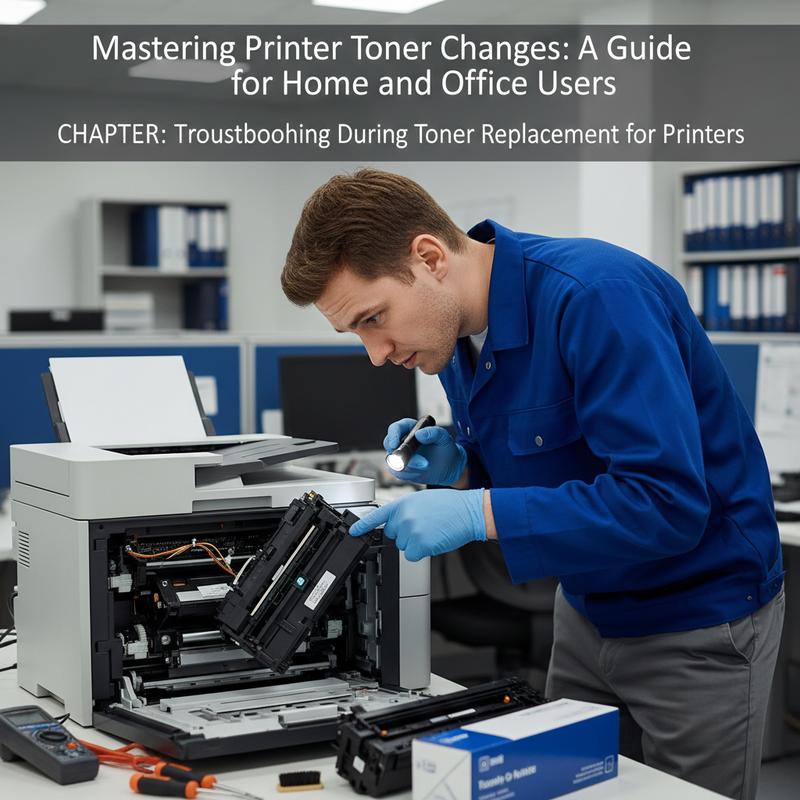
Replacing a toner cartridge in your printer often feels like a straightforward chore, yet it can occasionally introduce a slew of unexpected issues that disrupt printing quality or overall functionality. Here, we delve into a detailed troubleshooting guide to address some of the most common problems encountered during toner replacement and provide practical solutions to overcome them.
When you encounter poor print quality, such as faded, streaked, or patchy prints, the underlying causes can vary. One primary suspect is unevenly distributed toner within the cartridge itself. Before installing, it is essential to gently rock the new toner cartridge from side to side several times. This simple step redistributes the toner evenly, a crucial preparatory move often overlooked in the haste of replacement. Equally important is ensuring that the cartridge is correctly snapped into place; an improperly installed cartridge can compromise print quality. Another often-neglected component is the corona wire. By sliding the green tab on the drum unit back and forth, you clean this wire, ensuring its role in maintaining print clarity is upheld. Persistent quality issues may indicate a defective cartridge, necessitating a replacement.
At times, your printer might stubbornly refuse to recognize the new cartridge. This issue could arise from remnants of protective packaging still clinging to the cartridge, or from dirty electrical contacts. A quick visual check for and removal of any such obstructions is recommended. If this fails, use a dry, lint-free cloth to gently clean the contacts both on the cartridge and inside the printer, ensuring a clear electrical connection. Occasionally, the chip on the cartridge might be faulty. In such cases, resetting the toner level through your printer’s menu or consulting your device’s manual for specific instructions is advised.
Toner smearing or speckling on finished pages can be both frustrating and messy. This often stems from toner leakage inside the printer or improperly cleaned internal components. A proactive inspection for spills and careful cleaning with a toner vacuum or a dry cloth is essential. After ensuring the cartridge sits snugly in place, running a print test helps confirm the issue’s resolution.
Occasional error messages, such as “No Toner Cartridge” or “Toner Error,” might flash on your printer panel. These can often be traced back to misaligned toner gears or reset levers. Delicate cleaning around these parts using a cotton swab can resolve minor obstructions. Ensuring alignment between the reset gear and the drum unit is critical. If these measures prove futile, the cartridge or drum unit might require replacement. Adjusting the print density settings in the device’s control panel aids in rectifying overly dark or light prints, providing an immediate solution rooted in user adjustment.
For color printers, misaligned color prints can thwart professional presentation standards. Utilization of the printer’s built-in alignment utility, found within the maintenance menu, recalibrates the printheads. Running occasional cleaning cycles helps preserve the vibrant clarity of multi-colored documents.
It is prudent to remember several general tips for successful toner replacement. Powering down the printer before initiating replacement prevents damage or injury. Handle cartridges with care to prevent spillage, and always choose genuine or compatible high-quality cartridges to bypass compatibility hiccups. Regular cleaning of both the drum unit and corona wire reinforces longevity and operational efficiency.
While many issues are addressable with these straightforward remedies, certain instances may necessitate professional intervention. If conditions persist after your attempts, reaching out for expert assistance via a technician or the printer manufacturer’s support services, such as IT Solution Support, is a prudent course of action.
By following these structured troubleshooting guidelines, you equip yourself with the knowledge to tackle most toner-related issues head-on, ensuring your printer continually delivers high-quality results with minimal disruptions.
Navigating Brand-Specific Toner Replacement for Optimal Printer Performance
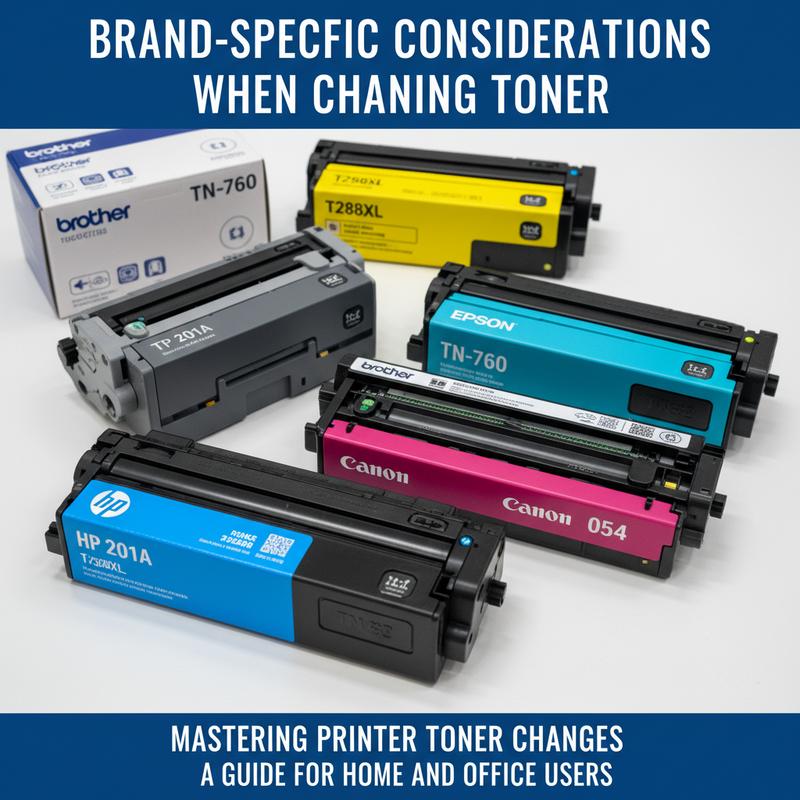
When it comes to changing toner cartridges in your printer, acknowledging the brand-specific nuances is vital for maintaining smooth operations and ensuring seamless performance. Major printer brands have distinctive requirements that can significantly influence the replacement process as well as the ongoing utility of your device.
Understanding Compatibility and Model Numbers
A crucial first step in replacing your toner cartridge is confirming the exact model number required by your printer. Printer brands like HP and Brother have intricate model coding systems—such as HP 131A or Brother TN760—that must align precisely with your machine’s specifications. Failure to match these model numbers can result in installation problems and even potential damage to your printer.
OEM vs. Compatible Cartridges
One of the pivotal decisions during toner replacement involves choosing between the Original Equipment Manufacturer (OEM) cartridges and compatible or remanufactured alternatives. While OEM cartridges, crafted by the printer brands themselves, assure complete compatibility and warranty coverage, compatible cartridges pose a more cost-effective solution. Despite their economic appeal, they may vary in quality, and some printers might display error messages for non-OEM products. However, using compatible cartridges does not void your printer’s warranty under U.S. regulations like the Magnuson-Moss Warranty Act.
Chip Communication and Firmware Challenges
Modern cartridges, especially from brands like HP, Canon, and Brother, typically include a chip that interfaces with your printer to verify authenticity and monitor toner levels. Third-party cartridges might face rejections or low toner warnings due to these chips. Overcoming these issues might require toner level resets or even firmware updates on your printer.
Yield and Cost Benefits
Brands offer cartridges in different yields, creating a choice between standard and high-yield options. High-yield cartridges (often marked as XL or X) like Brother’s TN760 provide a higher page yield and a reduced cost per printed page compared to their standard counterparts, making them ideal for users with substantial printing needs.
Installation and Maintenance Protocols
Brands issue specific installation guidelines to be followed meticulously. Mishandling during the installation process can lead to toner spills or cartridge misalignment. For some brands, such as Canon and Epson, it’s crucial to heed warnings against premature cartridge replacements, as disregarding these can lead to further complications. Regular maintenance, including cleaning the printer’s interior and its rollers, is advisable to avoid any print defects that may arise from changes in toner.type.
Print Quality Insights and Troubleshooting
Different brands manifest unique print quality issues. For example, HP and Brother printers might require a toner density adjustment to rectify smudging, whereas Epson and Canon printers might need print head cleaning. Should persistent issues occur post replacement, the prudent course of action would be consulting the brand’s troubleshooting guide or accessing support services.
For more information on securing brand-specific assistance, the IT Carolina printer services page can be a valuable resource for navigating the nuanced needs across different printer brands. Adhering to these brand-specific considerations ensures not just a successful toner replacement but also enhances your printer’s long-term performance and reliability.
Final thoughts
Changing the toner in your printer is a straightforward task once you understand the basics and know what to expect from your specific printer model. Through a detailed step-by-step process, helpful troubleshooting tips, and recognition of brand-specific requirements, you can now approach this task with confidence. Keeping your printer in good working condition ensures that you enjoy seamless document printing without delays or diminished quality. By staying informed about your printer’s needs, you help maintain both efficiency and cost-effectiveness in your home or office environment.
Need help changing your printer toner? Let us handle it—quickly and correctly!
Learn more: https://itcarolina.com/about/
About us
At IT Carolina, we don’t just optimize your home entertainment—we make all your tech easier, including printers. Whether you’re working from home or managing an office setup, our expert team provides hands-on support for routine tasks like changing toner, installing devices, and troubleshooting connectivity. We ensure your equipment runs smoothly so you can focus on what matters. With expert care and a frustration-free approach, IT Carolina is your trusted partner for all things tech—beyond gaming.