Accidentally deleting important files on your Windows system can be stressful. The good news is you’ve got a few solid ways to get them back, so you can get back to normal. This guide walks through the basics first (starting with the Recycle Bin), then moves into more advanced options like Windows File Recovery, backups and File History, and third-party recovery software. By the end, you’ll know what to try next and when it’s time to call in help.
Recycle Bin: Your First Stop for Deleted Files on Windows
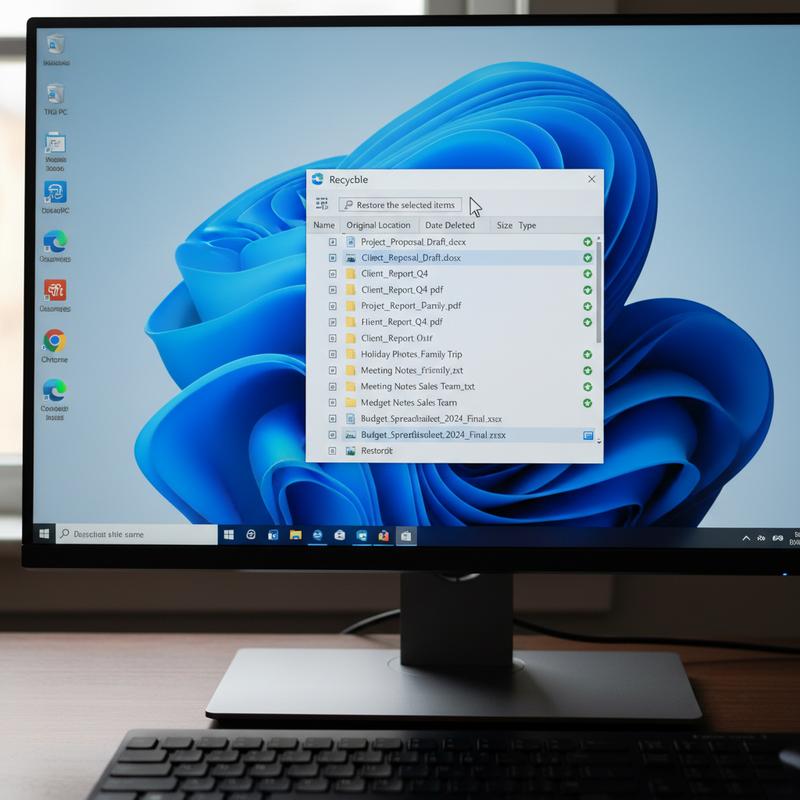
If you deleted something by mistake on Windows, the Recycle Bin is usually the quickest and easiest place to check. Treat it like your first stop—it can save you a lot of time versus jumping straight into heavier recovery tools. For most files deleted from local drives, Windows moves them here temporarily, so getting them back is often pretty simple (as long as they weren’t permanently removed).
To open it, find the Recycle Bin icon on your desktop (it looks like a trash can) and double-click it. You’ll see a list of recently deleted files and folders—things that haven’t been fully removed yet. You can scroll through the list or use the search bar in the top-right to look up a file by name. And if you can’t remember the name, the ‘Date deleted’ column can help you narrow it down.
Once you find what you need, restoring it only takes a moment. Select the file(s), right-click, and choose Restore. Windows will put them back exactly where they were before. Want more control? You can also drag files out of the Recycle Bin into another folder. After that, double-check the original location (or the folder you dragged them to) to make sure everything came back properly.
But the Recycle Bin has limits. Files deleted with Shift+Delete, files removed from external drives, or anything deleted after you empty the Recycle Bin won’t show up here. In those cases, you’ll need a different recovery option. And yes, Ctrl+Z can sometimes undo a recent delete in File Explorer—but it’s hit or miss, especially after a restart, so don’t count on it as your main plan.
If your files aren’t in the Recycle Bin, you may need to switch to more advanced tools. Programs like Disk Drill and EaseUS Data Recovery Wizard can scan your drive more deeply and find deleted data that never made it into the Bin. They usually offer both quick scans and deep scans, depending on how severe the deletion was.
One big thing: act fast. The longer you wait, the more likely new data will overwrite what you’re trying to recover, which makes recovery harder (or impossible). It’s also smart to save recovered files to a different drive or cloud storage to avoid overwriting anything else. And if you suspect files are hidden, you can adjust visibility in File Explorer by unchecking the ‘Hide protected OS files’ option under the View > Settings menu.
If you’ve tried the basics and you’re still stuck, professional data recovery services may be the next step. The Recycle Bin is a great first move, but knowing what it can’t do is just as important when you’re trying to recover files on Windows.
If you’re interested in learning more about protecting your data and ensuring it remains secure, consider reading about cloud storage for beginners. Using cloud solutions can add another backup option that greatly lowers the risk of losing files for good.
Windows File Recovery: Command-Line Options to Get Deleted Files Back
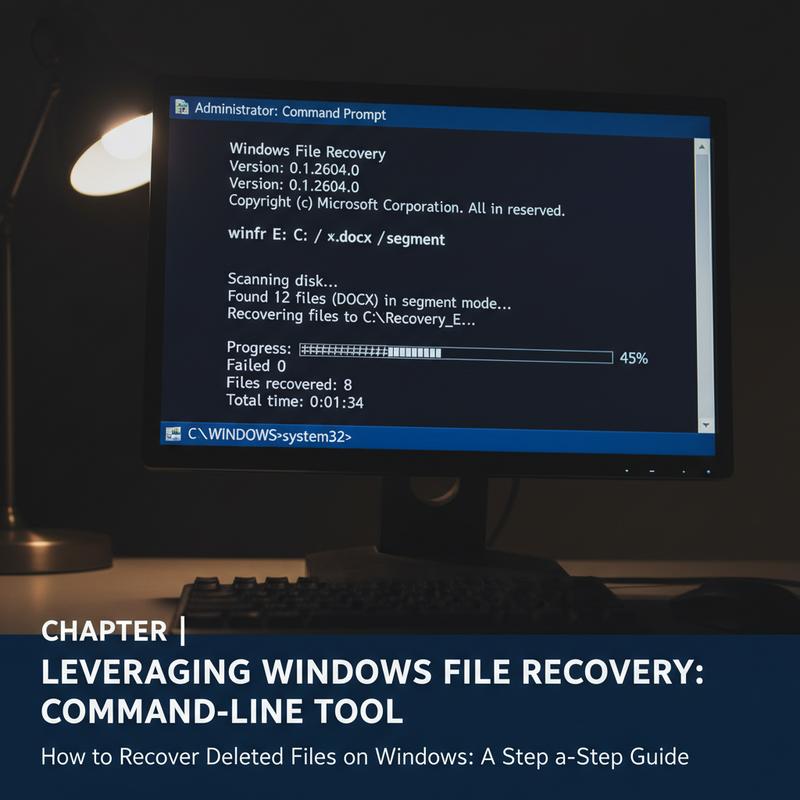
If your files are truly gone from the usual places, Windows File Recovery is one of the built-in options that can still save you—though it works through the command line. It’s made for Windows 10 and 11 and can recover deleted files across different file systems using a few different modes. Unlike the Recycle Bin, it can search deeper on the drive and sometimes pull back files that are already past that first safety net.
Understanding Windows File Recovery
Windows File Recovery runs entirely through Command Prompt. It can recover from file systems like NTFS and FAT using four modes: Regular, Extensive, Segment, and Signature. That range matters because not every data loss situation is the same—accidental deletes are one thing, but formatting or factory resets are another. Each mode checks the drive differently, so you can pick what fits your situation.
Getting Started with the Tool
First, make sure your PC supports it. Windows File Recovery comes pre-installed on Windows 11, but Windows 10 users need to download it (you’ll need version 2004 or later). You’ll also need administrator access. Open Command Prompt as an admin so the tool can actually do its job.
The command format is straightforward: winfr <source-drive>: <destination-folder> [/mode] [/switches]. You’ll set the drive you’re recovering from and the folder where recovered files should go. One key rule: the destination should be on a different physical drive so you don’t overwrite the data you’re trying to recover.
Executing File Recovery
Once you’ve got the format down, you can adjust the command based on what happened. If you’re trying to recover recently deleted DOCX and XLSX files, Regular mode might be enough. If the drive was formatted or the system was reset, Extensive or Signature modes may be a better fit since they can dig deeper. In general: Regular is best for simpler cases, Extensive is better for formatted drives, Segment is for certain file system conditions, and Signature helps when you don’t know the file location or type.
How long it takes depends on the drive size and condition. When it’s done, the recovered files will be saved to the destination you picked. And if there are naming conflicts, Windows File Recovery adds an _R prefix so it doesn’t overwrite anything that already exists.
Navigating Challenges and Expanding Solutions
Still, this tool isn’t perfect. The command line can feel intimidating at first, and recovery rates drop a lot if files have already been overwritten—especially on SSDs, where TRIM can make recovery much harder. It also doesn’t directly handle hidden files, so you may need extra steps or tools depending on what you’re recovering.
If that sounds like too much, you’ve got options. Third-party tools like EaseUS or Recuva use a regular app interface (no commands), which many people find easier—even though free versions can have limits or paid upgrades. Explore advanced data recovery techniques if you want a clearer picture of what to try next.
So yes, Windows File Recovery can work really well—but it takes a bit of patience and careful steps. Once you understand how the modes work and when to use them, you’ll have a solid shot at getting your files back.
Windows Backup and File History: Recover Files the Easy Way
Losing files can feel like a disaster, but Windows Backup and File History can make recovery a lot less painful. These tools work best when they’re set up ahead of time, since they’re designed to prevent file loss from becoming permanent. Still, many people forget they exist until something goes wrong—so it’s worth knowing what they can do.
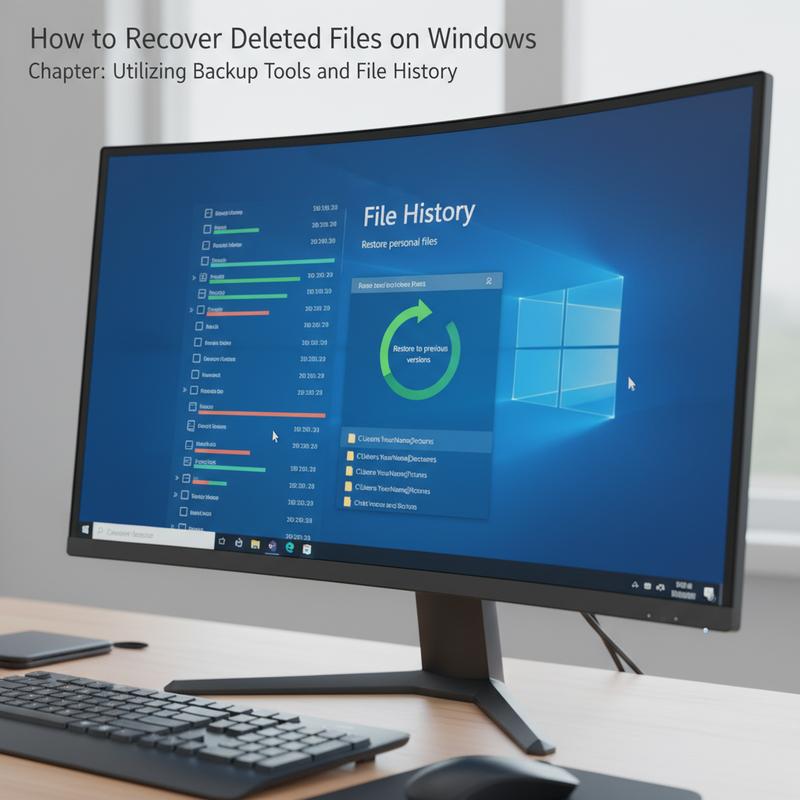
File History: Windows’ Built-In Lifesaver
File History can be a real lifesaver if you had it turned on before the file was deleted. It saves versions of your files over time, which means you can roll back to an earlier copy instead of trying to “hunt” for deleted data. The big catch is that it needs to be enabled in advance, and it stores those copies on a separate drive. To utilize File History, navigate to the Windows File Recovery window, choose “Windows File Recovery,” and opt for either Regular or Extensive scanning to suit your recovery needs. Provided File History was enabled, you’ll find a repository of archived versions ready for retrieval.
Robust Backup Solutions: Prepare for the Unexpected
File History is helpful, but full backup software can cover more ground. Tools like EaseUS Todo Backup let you schedule backups, pick specific folders, save entire partitions, or even clone your operating system. So if your system crashes or something major breaks, you’re not starting from scratch—you’ve got a copy ready to restore.
Strategic Approaches to Backing Up
Backups work best with a little planning. Before big changes like resets or major upgrades, make sure you have a fresh backup. A system image backup can capture your whole setup at once, so you can roll back if needed. And don’t keep all backups in one place—mix it up with an external hard drive, USB flash drive, or cloud storage. If you’re new to cloud storage, this guide is a solid place to start. Setting a routine schedule helps too, so you’re not relying on memory when things get busy.
If you don’t have any backups already, you’ll likely need recovery software like EaseUS Data Recovery Wizard or Recuva. These can scan your drive and find files that are still recoverable. Thing is, speed matters—your odds are best before the deleted data gets overwritten by new files. With a mix of prevention (backups) and recovery tools, you’ll be in much better shape when something goes missing.
Data Recovery Software: Getting Files Back on Windows

When the Recycle Bin doesn’t help, data recovery software is often the next best move. Tools like Disk Drill are popular because they’re easy to use and can recover a lot of common file-loss situations without making you mess with command-line commands.
Before you start using Disk Drill, take a couple of quick precautions to avoid making things worse. Download it from the official website, and install it on a different drive than the one you’re trying to recover from. That helps prevent accidental overwriting, which can ruin recovery chances.
After it’s installed, open Disk Drill and choose the drive where the files were deleted. It works with a range of file systems like NTFS and FAT32, and it can also scan BitLocker-encrypted drives. And if you’re on Windows 11 and prefer it, you can flip on dark mode.
Disk Drill uses two main scan types. The Quick Scan is best for recently deleted files, and it’s especially fast on NTFS because it can use file system metadata. If Quick Scan doesn’t find what you need, the Deep Scan goes much further by checking file fragments, with a stated success rate of up to 91%. This is the option you’ll want if files were fragmented or partially overwritten and you need a more thorough search.
After the scan, you can preview results and only recover what you actually need. Save recovered files to a different drive so you don’t overwrite other recoverable data. Disk Drill has a freemium option with a 500 MB recovery limit, and the Pro version removes that limit, which can be helpful if you’ve lost a lot at once.
Other tools may fit better depending on what you’re dealing with. R-Studio is geared more toward advanced or professional use and can handle deeper analysis and multi-OS work. Recuva is a free option that covers basic recovery without costing anything. Still, no matter which software you use, there’s one hard limit: if the data has been overwritten, recovery may not be possible.
A good recovery plan also includes knowing when to stop and ask for help—especially with SSDs (where TRIM can complicate things) or when sensitive files are involved. Software can get you far, but acting quickly and understanding the limits makes a big difference.
For insights on protecting your data from leaks and maintaining security post-recovery, explore our guide on how to check if your data has been leaked, which includes practical steps to protect your information.
Final thoughts
Getting deleted files back on Windows doesn’t have to be scary. Start with the Recycle Bin, then move to Windows File Recovery, backups/File History, or dedicated recovery software if you need to. Each option helps in different situations, so it’s worth trying them in order. And remember—don’t wait too long, because the longer you use the drive, the more likely the files will be overwritten. If things get complicated, bringing in a pro can save you a lot of frustration.
Lost important files on your Windows PC? Need a hand getting them back? Reach out to IT Carolina and we’ll walk you through it.
Learn more: https://itcarolina.com/about/
About us
IT Carolina is your go-to tech support team for recovering deleted files and getting Windows PCs running the way they should. If you accidentally wiped out an important document or you’re not sure which recovery tool to use, our technicians can help with one-on-one support at your home. We also handle PC tune-ups and troubleshooting to keep your system fast, stable, and better protected. When you need reliable file recovery and real help you can understand, IT Carolina has you covered.