Your computer was fine yesterday. You let Windows update overnight. Now everything crawls — apps take forever to open, the disk light stays solid, and the fan runs constantly. Before you spend an hour trying random fixes, there’s one thing to settle first: is this normal post-update processing, or an actual Windows bug?
The answer determines everything. Normal background processing after an update — Windows rebuilding the search index, finishing update installation, running a Defender scan — looks identical to a real bug but resolves on its own within 2–24 hours. A real bug won’t. This guide shows you how to tell the difference in two minutes, then covers the seven most effective fixes for the 2025–2026 Windows update issues we see most often.

Before Anything Else: 2-Minute Diagnosis in Task Manager
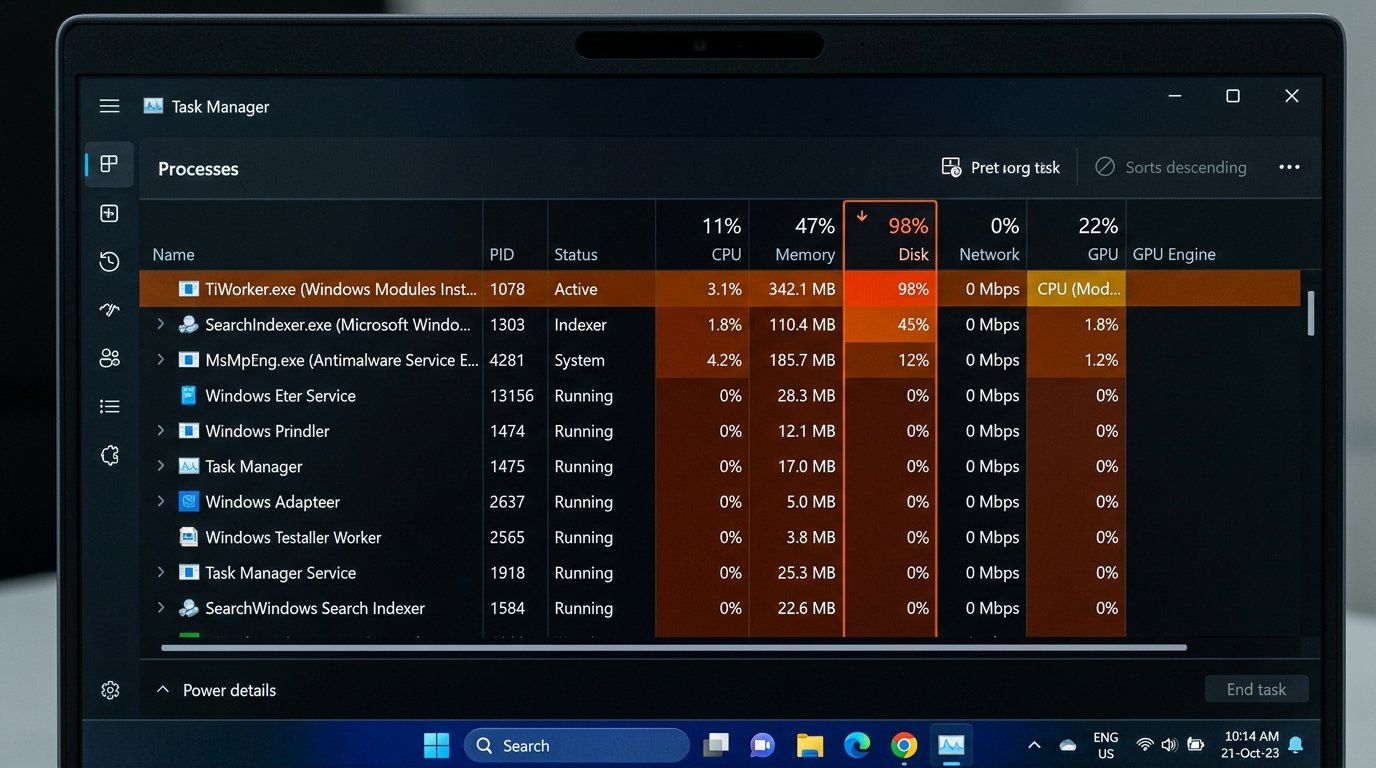
Open Task Manager: press Ctrl + Shift + Esc. Click the CPU column header to sort by usage, then click Disk to sort by disk activity. Look for the process name at the top of each list.
| Process you see | What it means | Action |
|---|---|---|
| TiWorker.exe / Windows Modules Installer Worker | Finishing update installation — normal | Wait up to 4 hours, then Restart |
| SearchIndexer.exe | Rebuilding search index — normal on HDD | Wait up to 24 hours |
| MsMpEng.exe (Antimalware Service) | Post-update Defender full scan — normal | Wait 1–3 hours |
| svchost.exe (DoSvc) consuming >2 GB RAM | Delivery Optimization memory leak (2025 bug) | Fix 2 below |
| AppXSvc high disk on every boot since Dec 2025 | KB5072033 changed AppX service to auto-start | Fix 3 below |
| ngen.exe / .NET Runtime Optimization | Pre-compiling .NET assemblies — normal | Wait 1–2 hours |
If Task Manager shows one of the “normal” processes — stop here, wait it out, and do a full Restart (Start → Power → Restart, not Shut Down). That clears the pending update queue. If you’re still slow after 24 hours, continue below.
Fix 1 — Restart Properly and Set Active Hours
A proper restart — not a shutdown and power-back-on — completes the final pending update steps. Many people shut their computer off without restarting, leaving TiWorker.exe running every session.
Use Restart, not Shut Down: Start menu → Power → Restart. Fast Startup (enabled by default) makes Shut Down behave like hibernation and doesn’t clear the update queue.
Set Active Hours to stop Windows from processing updates during your work day:
- Windows 11: Settings → Windows Update → Advanced options → Active hours → set your typical working hours (e.g., 8 AM – 6 PM)
- Windows 10: Settings → Update & Security → Windows Update → Change active hours
With Active Hours set, Windows holds all background update processing and restarts until outside your defined window. Your workday stays uninterrupted even on heavy Patch Tuesday months.
Fix 2 — Tame the Delivery Optimization Memory Leak
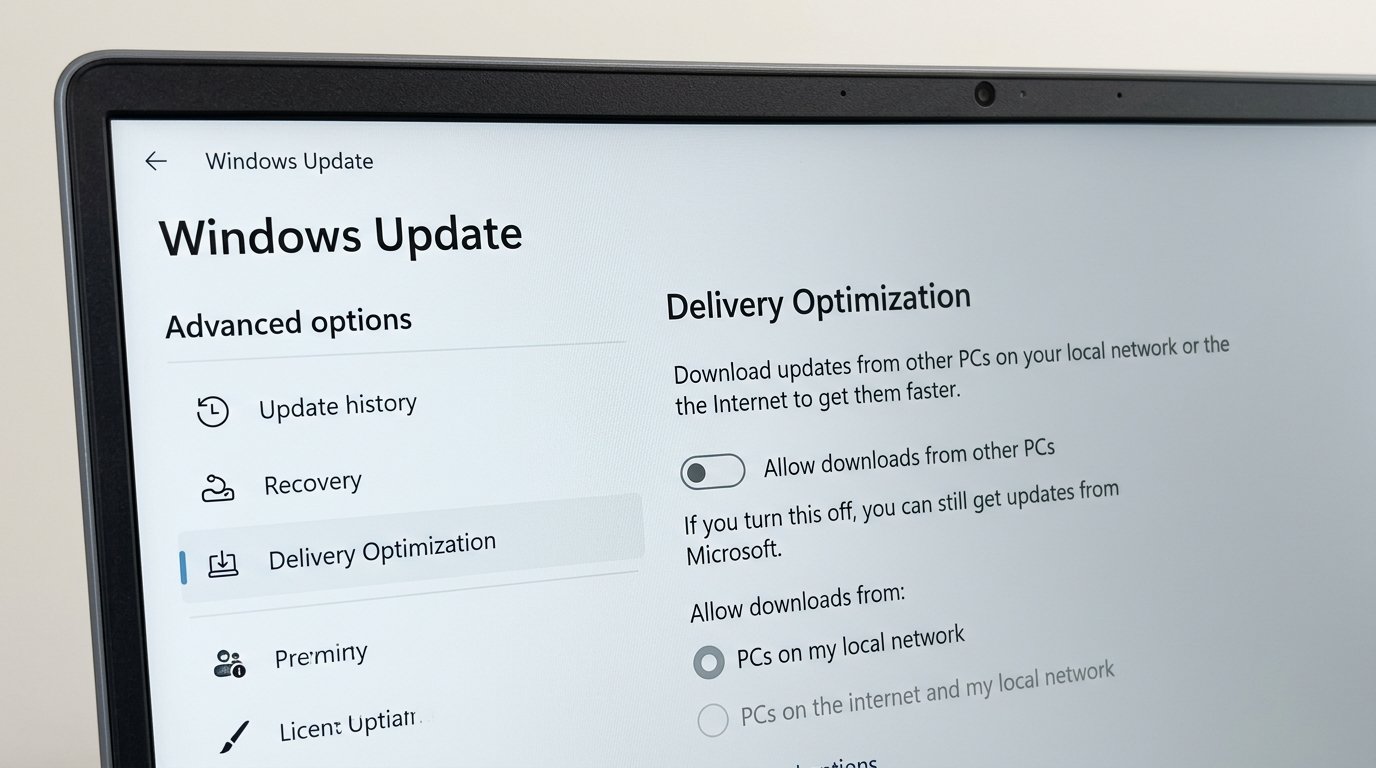
Delivery Optimization (DoSvc) is Windows’ peer-to-peer update-sharing service — it uses your connection to distribute updates to other PCs on your network and the internet. In late 2025, a memory leak caused the DoSvc process to silently consume up to 20 GB of RAM over several hours of uptime. Systems with 8–16 GB of RAM were effectively running out of memory with nothing visibly open.
Check if this is your problem: In Task Manager, click the Memory column. If svchost.exe (Delivery Optimization) is consuming 2 GB or more — this is the culprit. On older builds, it could grow to 15–20 GB.
Limit Delivery Optimization (recommended fix for most users): (Microsoft documentation)
- Settings → Windows Update → Advanced options → Delivery Optimization
- Turn off “Allow downloads from other PCs” — or keep it on but click “Advanced options” and set bandwidth limits (background download: 10–20%; monthly upload limit: 1 GB)
Stop the service entirely (for persistent cases):
- Press Win + R → type
services.msc→ Enter - Find Delivery Optimization → right-click → Properties
- Set Startup Type to Manual → click Stop → OK
Note: Microsoft fixed this memory leak in the May 2026 Patch Tuesday cumulative update (KB5089549). If your system is fully up to date, the issue should be resolved automatically.
Fix 3 — Fix the AppXSVC Startup Regression (December 2025 Update)
This is the most commonly overlooked cause of post-update slowdowns on Windows 11 in early 2026 — and the easiest to fix.
Update KB5072033 (December 2025) silently changed the AppX Deployment Service (AppXSVC) from starting on demand to starting automatically at every boot. Microsoft’s changelog described it as improving “reliability in isolated scenarios.” In practice, it added measurable disk I/O and RAM pressure to every startup — most noticeable on laptops with 8 GB RAM and slower storage.
Fix it with a single command — open Command Prompt as Administrator (press Win, type cmd, right-click → Run as administrator) and paste:
sc config AppXSVC start= demandOr in PowerShell (Administrator):
Set-Service -Name AppXSVC -StartupType ManualRestart after applying. Do not set AppXSVC to Disabled — that breaks the Microsoft Store and Settings app. Manual startup means it still runs when needed, just not at every boot.
We applied this fix remotely to six Dell OptiPlex 3070 workstations at a Charlotte accounting firm after their team noticed everything felt sluggish from the first login of the day. Boot times dropped back to normal within the same session.
Fix 4 — Repair Corrupted System Files with SFC and DISM
A failed or interrupted update can leave Windows system files in a partially broken state — enough to cause persistent slowness, random application hangs, or update failures on the next cycle. SFC and DISM fix this by replacing damaged files from a clean source.
Open Command Prompt as Administrator and run these in order — DISM first to repair the component store, then SFC which uses it as its reference:
DISM /Online /Cleanup-Image /RestoreHealth(Takes 20–45 minutes; downloads clean files from Windows Update — requires internet)
sfc /scannow(Takes 10–20 minutes; replaces corrupted system files using the now-repaired component store)
Restart after both complete. If SFC reports “found corrupt files but was unable to fix some of them” — reboot into Safe Mode (hold Shift and click Restart → Troubleshoot → Advanced options → Startup Settings → F4) and run sfc /scannow again from there.
Results are logged at C:\Windows\Logs\CBS\CBS.log. Full command reference: Microsoft SFC documentation — search for [SR] entries to see what was repaired.
Fix 5 — Roll Back a Driver Windows Update Replaced
Windows Update has a habit of replacing manufacturer-installed GPU and network drivers with generic Microsoft versions. The generic driver works — but often performs worse, uses more CPU, and causes stability problems that look like general system slowness.
Check your GPU driver first:
- Press Win + X → Device Manager
- Expand Display adapters
- If you see “Microsoft Basic Display Adapter” — Windows replaced your GPU driver. Download the correct one directly from NVIDIA, AMD, or Intel (not through Windows Update)
Roll back any recently updated driver:
- Device Manager → expand the relevant category (Display adapters, Network adapters)
- Right-click the device → Properties → Driver tab → Roll Back Driver
- If “Roll Back Driver” is greyed out — no previous version is stored; download the prior version from the manufacturer’s support site using your device model number
See which drivers Windows auto-installed: Settings → Windows Update → Update history → scroll to the Driver Updates section — lists every driver Windows installed automatically, with dates.
Fix 6 — Disable SysMain on Hard Drive Systems
SysMain (formerly Superfetch) preloads frequently used applications into RAM in anticipation of you opening them. On SSDs with 16+ GB RAM, it’s genuinely useful and should stay on. On HDDs or systems with 4–8 GB RAM, it competes with actual work for disk bandwidth and memory — and post-update, it kicks off an intensive relearning cycle that can keep your disk at 100% for hours.
Check before disabling: In Task Manager, sort by Disk — if “SysMain” or “Service Host: SysMain” is consistently in the top three processes, disable it.
Disable via Services:
- Win + R → type
services.msc→ Enter - Find SysMain → right-click → Properties
- Startup Type: Disabled → click Stop → OK → Restart
Or via Admin Command Prompt:
sc stop SysMain && sc config SysMain start= disabledAfter disabling, monitor Task Manager for 30 minutes. If disk usage stays below 20% and app launch speeds are similar, keep it disabled. If apps take noticeably longer to open — re-enable it; your system needs the preloading.
Fix 7 — Uninstall the Update
If nothing above resolves the slowdown, and you can trace the problem to a specific update by date, uninstalling it is a clean reset. This is the right call for update bugs like KB5048667 (December 2024, which caused CPU performance to degrade over a session) or the July 2025 batch that caused 30-minute boot delays on Windows 10.
Find the KB number of the last installed update:
Settings → Windows Update → Update history → Quality Updates — the most recent entry is at the top, with its KB number.
Uninstall on Windows 11:
Settings → Windows Update → Update history → Uninstall updates → find the KB → Uninstall
Uninstall on Windows 10:
Settings → Update & Security → Windows Update → View update history → Uninstall updates
Official step-by-step walkthrough: How to uninstall a Windows update — Microsoft Support
If the computer won’t boot properly:
Hold Shift and click Restart → Troubleshoot → Advanced options → Uninstall Updates → Uninstall latest quality update
Roll back the entire Windows version (10-day window only):
Settings → System → Recovery → “Go back” — available for 10 days after a major update install. After that, the rollback files are deleted to free space.
After uninstalling, pause Windows Update for 1–2 weeks: Settings → Windows Update → Pause updates → select a date. This gives Microsoft time to release a fixed cumulative update before you’re re-exposed to the problematic version.
When to Call IT Support
If you’ve worked through all seven fixes and the computer is still significantly slower than before the update, the issue is likely one of the following:
- Underlying hardware failure exposed by the update — aging HDDs that were borderline before the update often fail completely after the additional write load. Run
wmic diskdrive get statusin Command Prompt; “Caution” or “Bad” means the drive is failing. - RAM failure — Windows Memory Diagnostic (Win + R →
mdsched.exe) can confirm whether RAM is failing under the load. - Update corruption that SFC/DISM can’t reach — some low-level boot component corruptions require a repair install or clean Windows install to resolve properly.
- Driver conflicts beyond a simple rollback — particularly common with hybrid Intel/AMD systems after a Windows 11 25H2 or 24H2 update.
IT Carolina helps homeowners and small businesses across Charlotte diagnose and fix post-update slowdowns — remotely or on-site. If your team lost a day of productivity to a Windows update issue and none of the above steps resolved it, reach out for a free diagnostic. We’ll identify the exact cause and have you running at full speed.
Frequently Asked Questions
How long should my computer be slow after a Windows update?
Normal post-update background processing — Windows finishing the update, rebuilding the search index, running a Defender scan — takes 2 to 24 hours, with most systems returning to normal within 4 hours. If your computer is still noticeably slow after a full 24 hours and a clean Restart, you’re dealing with an update bug or a service regression rather than normal background work. At that point, the 7 fixes in this guide apply.
Is it safe to uninstall a Windows update?
Yes — uninstalling a Windows cumulative update rolls back that specific update’s changes while leaving everything else intact. Your files, applications, and settings are not affected. The main risk is that you’ll be temporarily missing a security patch. Pause Windows Update for 1–2 weeks after uninstalling so you don’t immediately reinstall the problematic update, then let Microsoft’s next cumulative update (which typically includes a fix) come through normally.
What is AppXSVC and is it safe to set to Manual?
AppXSVC (AppX Deployment Service) handles installation and updates for Microsoft Store apps. Setting it to Manual startup is safe — the service still runs when needed (when you install or update a Store app or open Settings). It simply stops launching at every boot, which is what the December 2025 Windows update changed without warning. Setting it back to Manual via sc config AppXSVC start= demand is the correct configuration for most users and does not break any Windows functionality.
My laptop is slow AND the battery drains faster after an update — related?
Almost always yes. When a background service like AppXSVC, Delivery Optimization, or SysMain keeps the CPU and storage active during idle, the laptop never enters its low-power states — fan runs, battery drains, performance throttles to manage heat. Fixes 2, 3, and 6 in this guide address the most common causes of combined battery drain and slowness from 2025-2026 Windows updates. Also check Device Manager for any yellow-flagged drivers — a driver regression can prevent proper power state transitions entirely.
John Jones
Senior IT Specialist, IT Carolina
John has 12 years of hands-on experience diagnosing and resolving computer, printer, and network issues for homeowners and small businesses across Charlotte, NC. He has helped hundreds of clients recover from Windows update failures, driver conflicts, and hardware problems — often resolving in a single remote or on-site session.
Share this article: